
This blog introduces the capability of processing batches using the For Each activity in orchestration type integrations and follow the same writing style as the book. We sometimes use the same resources as we used in the book, which can be downloaded from the website of Packt. For this blog we are using the same WSDL as we used in chapter 5, Going Social with Twitter and Google, and as in chapter 10, Advanced orchestration with branching and asynchronous flows, but with a little change to one element.
The integration we are going to build simulates a notification send from our Airport Flight Schedules system with a list of persons that are missing / late for their flight. For each flight a list of persons are included in the notification. For each missing person a task is added to a Trello Board, used by the ground personal, to remove the passengers luggage from airplane.

Getting Started
In the books resources find the file ICSBook-Ch5-FlightSchedules-Source.WSDL and make a copy of it and rename the file to ICSBook-Dg1-FlightSchedules-Source.WSDL. In this file we are going to make a small change, edit the new WSDL and search for the complexType MissingPersonType. Make its child element missingPerson multiple by adding the attribute minOccurs and maxOccurs. Shown in the following code sample:
[xml highlight="7,8"]<xs:complexType name="MissingPersonType">
  <xs:sequence>
    <xs:element name="faFlightID" type="xs:string"/>
    <xs:element name="ident" type="xs:string"/>
    <xs:element name="origin" type="xs:string"/>
    <xs:element name="destination" type="xs:string"/>
    <xs:element name="missingPerson" type="FS:PersonType" minOccurs="0" maxOccurs="unbounded"/>
    <xs:element name="mailSettings" type="FS:MailSettingsType"/>
  </xs:sequence>
</xs:complexType>[/xml]
Save and close the file. Now that we have our WSDL change done, that is required for our integration, we can create the necessary connections.
Create the necessary Connections
Like explained in the beginning of this guide our integration uses two connections. A SOAP styled connection which triggers the integration and a Trello styled connection which is invoked for each missing person in the request message. Navigate to the Connections section of the Designer in ICS.
If you already have the FlightSchedules_Ch5 connection created while going through chapter 5 of the book then you can easily clone the connection and/or update the WSDL by uploading the edited WSDL. You can also create the SOAP connection from scratch using ICSBook-Dg1-FlightSchedules-Source.WSDL. The steps to create the connection are the same as in Chapter 2, Integrating your first two applications, and chapter 3, Distribute messages using pub – sub model), so if you need the detailed steps we would like to refer-back to those chapters. Use the following configuration to create the connection:
| Property | Values |
| Connection Name | FlightSchedules_DG1 |
| Identifier | This will be proposed based on the connection name and there is no need to change unless you would like an alternate name |
| Connection Role | Trigger |
| Description | This receives changes to Flight Schedules, like delayed flights and missing persons |
| Email Address | Your email address |
| WSDL URL | Connection Properties (popup) | Tick the Upload File, and then use the File selection to upload the ICSBook-Dg1-FlightSchedules-Source.WSDL (provided earlier).
Close with the OK button |
| Security Policy | Credentials (popup) | Set Security Policy to No Security Policy. Close the dialogue with the OK button |
To invoke Trello we are using the connection created in chapter 10 named Trello_Ch10. For detailed steps and a better understanding we would like to refer-back to that chapter. To create this connection you need the API key and Oauth Secret. These values can be retrieved by login into your Trello account and visit the webpage https://trello.com/app-key. If you don’t have a Trello Account yet you can create one from https://trello.com/signup.
The connection can be created using the following configuration:
| Property | Values |
| Connection Name | Trello_Ch10 |
| Identifier | This will be proposed based on the connection name and there is no need to change unless you would like an alternate name |
| Connection Role | Invoke |
| Description | This connection interacts with the Trello API to for example create or list tasks |
| Email Address | Your email address |
| Configure Security | Credentials (popup) | Set Security Policy to Custom Security Policy. Enter the values we collected in fourth step of the setup for API Key and Oauth Secret.For the Access Scope enter read,write. |
* Don’t forget to give ICS consent to use your Trello API Key.
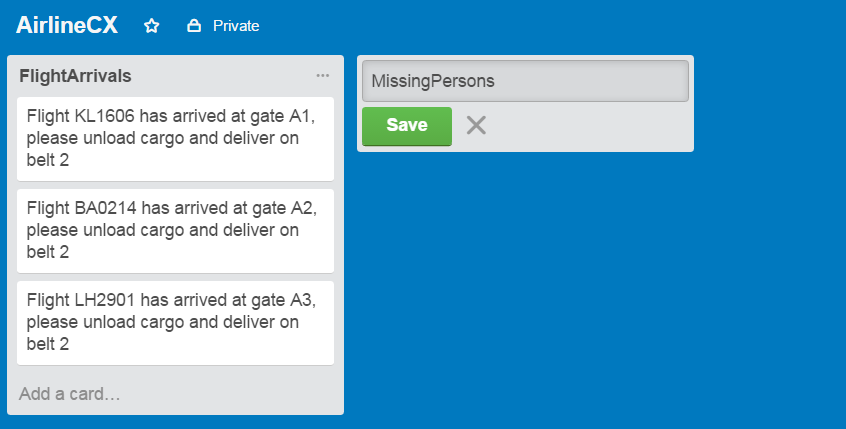
Setting up Trello list for missing persons
For our integration we are going to use new list within our existing AirlineCX board. Login to Trello and click on AirlineCX, if you don’t have this board yet you can create it from the dashboard.

Also create a new list on the AirlineCX board called MissingPersons.
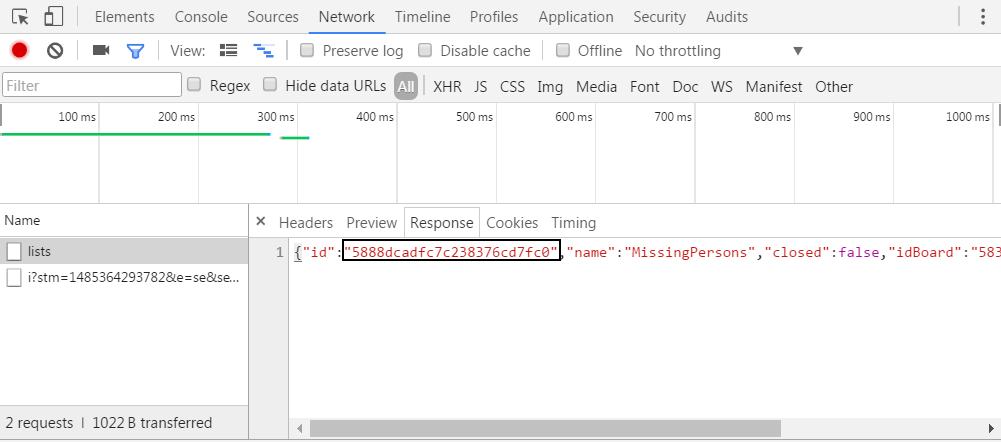
Don’t forget to retrieve the id of the new list. Like described in the book you can retrieve this using the developer console of your browser. Look at the network calls and find the call to the lists resource.
Building the Orchestration
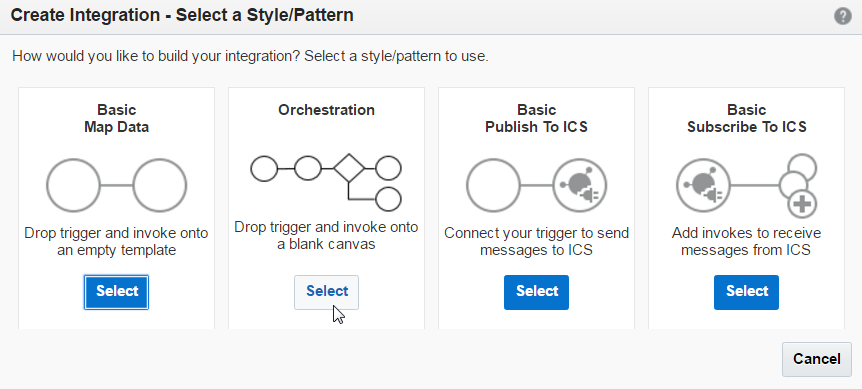
With the connectors established and the Trello list created we can create the orchestration. Navigate to the Integrations section of the Designer and create an integration with the Orchestration pattern.
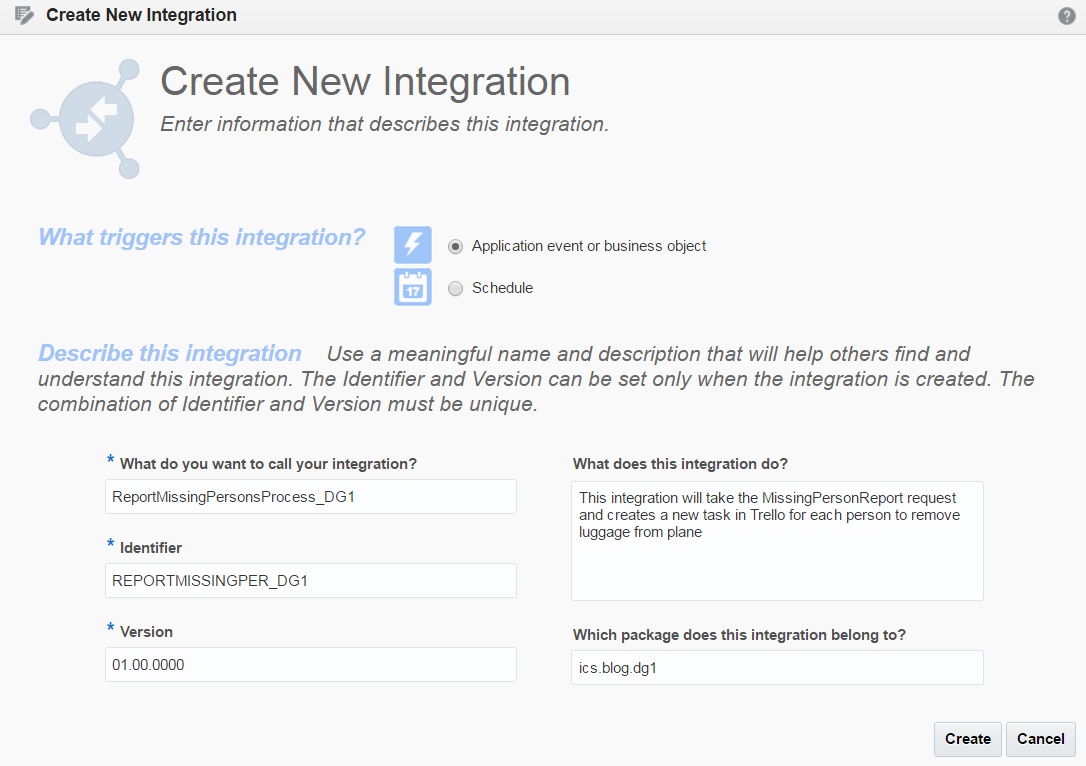
Create the orchestration using the following details:
| Property | Values |
| Integration Name | ReportMissingPersonsProcess_DG1 |
| Identifier | This will be proposed based on the connection name and there is no need to change unless you would like an alternate name |
| Version | 01.00.0000 |
| Description | This integration will take the MissingPersonReport request and creates a new task in Trello for each person to remove luggage from plane |
| Package Name | ics.blog.dg1 |
| What triggers integration? | Application event or business object |
As shown in next image:
With these values set we can complete the step using Create button. Once the integration has been created, we see an empty canvas with an empty start point and an arrow pointing to the end just like in we saw in Chapter 10. On the left-side you find the TRIGGERS panel, expand this panel and look for the SOAP | FlightSchedules_DG1 connection. Drag and drop this connection to the empty start point indicated by the large plus (+) symbol. The trigger creates the inbound connection into our integration.
Complete the endpoint configuration wizard with the following values:
| Tab | Question | Answer |
| Basic Info | What do you want to call your endpoint? | Call it ReceiveList |
| What does this endpoint do? | Receive a list of missing persons | |
| Review updated SOAP adapter runtime | Toggle to No |
|
| Operations | Selected Port Type | FlightSchedulePortType |
| Select the Operation | Select MissingPersonReport |
|
| Disable SoapAction Validation | Leave toggle to No |
With the wizard complete, and the Summary tab showing us the expected details we can complete the wizard by clicking the Done button. The canvas is then updated accordingly, and now includes the trigger, mapping and return activity.
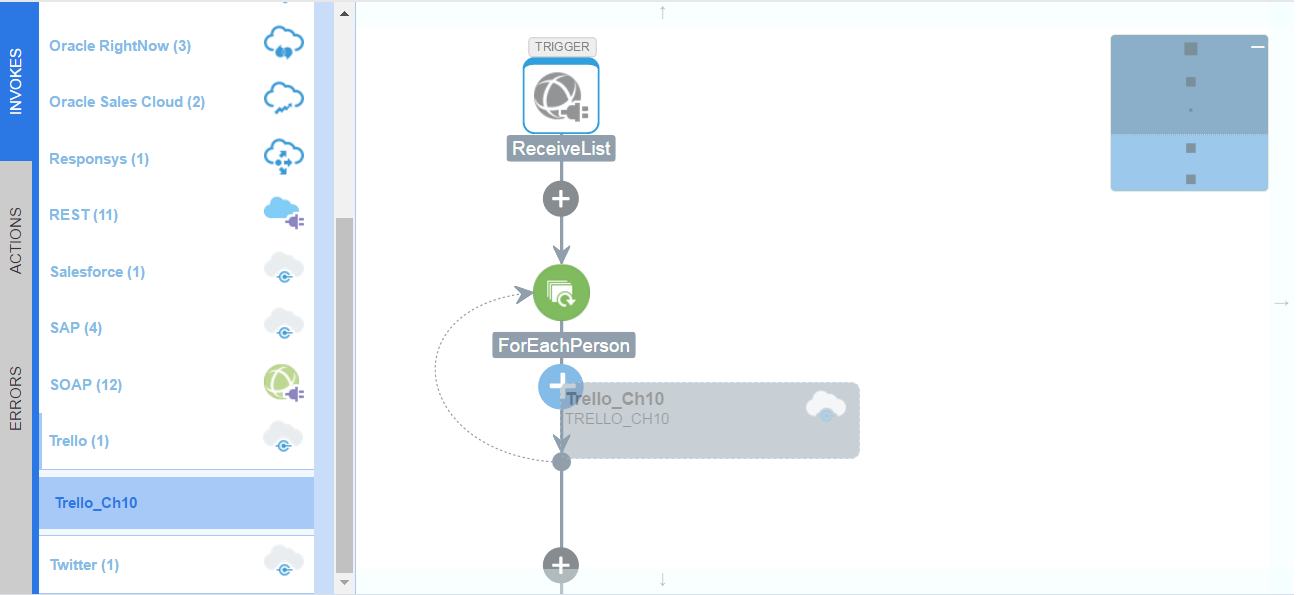
At the left-side you will notice that the TRIGGERS is gone and replaced by the INVOKES and ACTIONS panels. Next drag and drop the For Each action before the ReceiveList mapping. This will open the For Each dialogue.

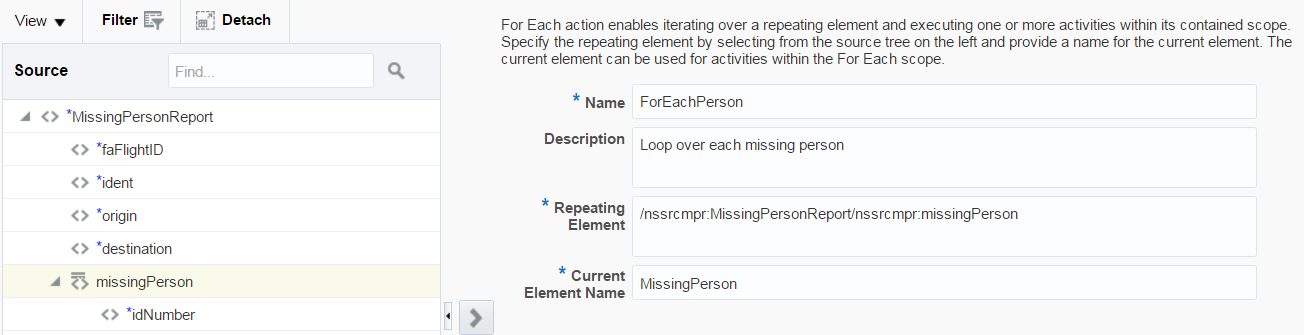
Looping over element using the For Each action
The For Each action enables us to iterate over a repeating element and it executes one or more activities within its containing scope. We need to specify the repeating element by selecting it from the source tree on the left and provide a name for the current element it is iterating and an optional description. We can use this current element in our activities within the For Each scope.
Finish the dialogue using the following information:
| Property | Values |
| Name | ForEachPerson |
| Description | Loop over each missing person |
| Repeating Element | /*:MissingPersonReport/*:missingPerson |
| Current Element Name | MissingPerson |
As shown in next image:
Click on Done the accept these values. The canvas is yet again updated and now shows the For Each activity. Within this activity we can add others, like an invoke to Trello. From the INVOKES panel drag and drop the Trello | Trello_Ch10 connection between the start and end of the For Each activity shown next.
Complete the endpoint configuration wizard with the following values:
| Tab | Question | Answer |
| Basic Info | What do you want to call your endpoint? | Call it CreateTask |
| What does this endpoint do? | Create a new task for ground personnel to remove luggage from the plane | |
| Operations | Select Operation | Select Create a card |
With the wizard complete, and the Summary tab showing us the Endpoint URI of Trello and the method we chosen. We can complete the wizard by clicking the Done button. The canvas is then updated accordingly, and the For Each scope now includes a mapping and invoke activity.
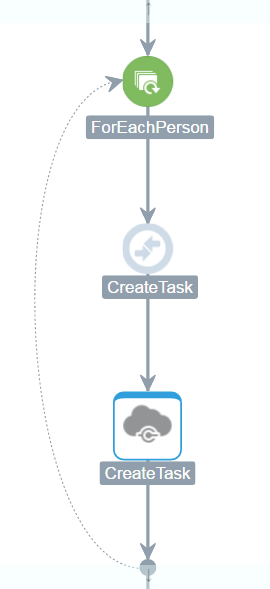
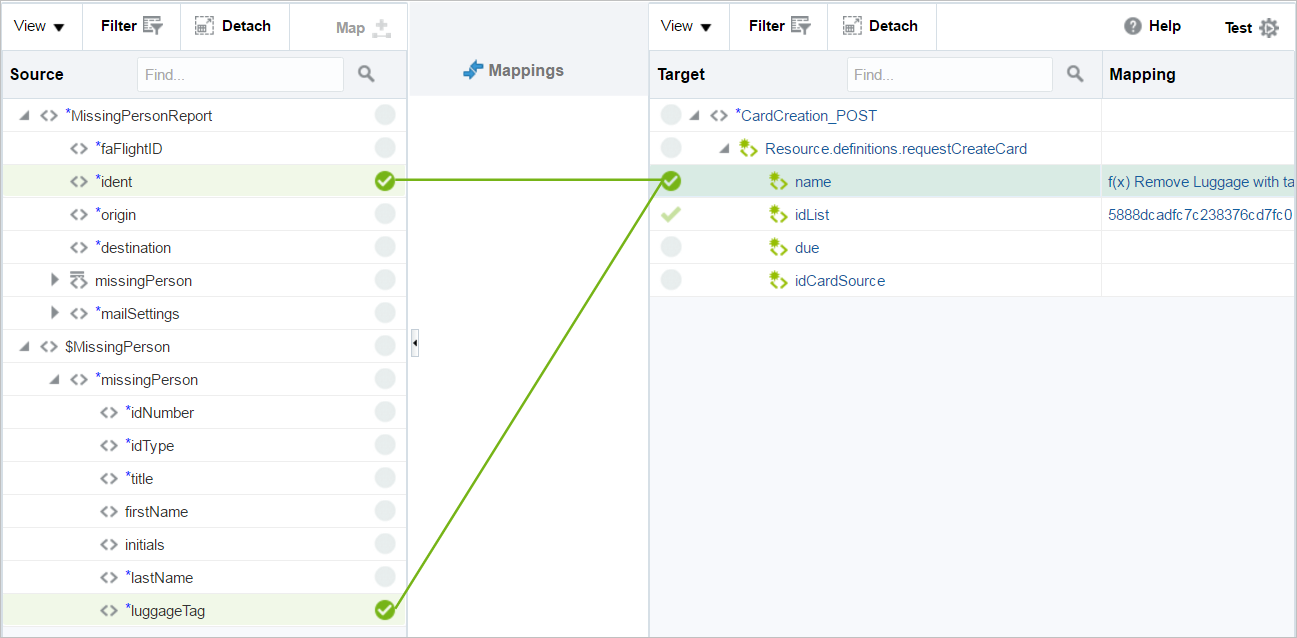
Edit the CreateTask mapping activity by clicking on the icon and subsequently on the edit icon. Complete the mapping with the following information:
| Source | Target |
| concat(‘Remove Luggage with tag #’, $MissingPerson/*:missingPerson/*:luggageTag, ‘ for Flight #’, /*:MissingPersonReport/*:ident)
* you can use |
requestCreateCard/name
* click on name to build mapping |
Value of MissingPerson list in Trello e.g 5888dcadfc7c238376cd7fc0 |
requestCreateCard/idList |
As shown in next image:
You can Test your mapping to check if concat works correctly. Save and Exit the Mapper to return to the canvas. Notice the mapping activity turned green to show it is active. Before we continue, save the Orchestration by clicking on the Save button in the top-right corner of the canvas.
To finish our Orchestration we need to create the mapping for the ReceiveList map activity at the end of our process. Just like we did a moment ago click on the map activity and subsequently on the edit icon to open the mapper dialogue.
Complete the mapping with the following information:
| Source | Target |
| /*:MissingPersonReport/*:faFlightID | /*:MissingPersonResult/*:parentID |
Literal value 1 |
/*:MissingPersonResult/*:processed |
| concat(‘Total task(s) created: “, count( /*:MissingPersonReport/*:missingPerson)
* The |
/*:MissingPersonResult/*:message |
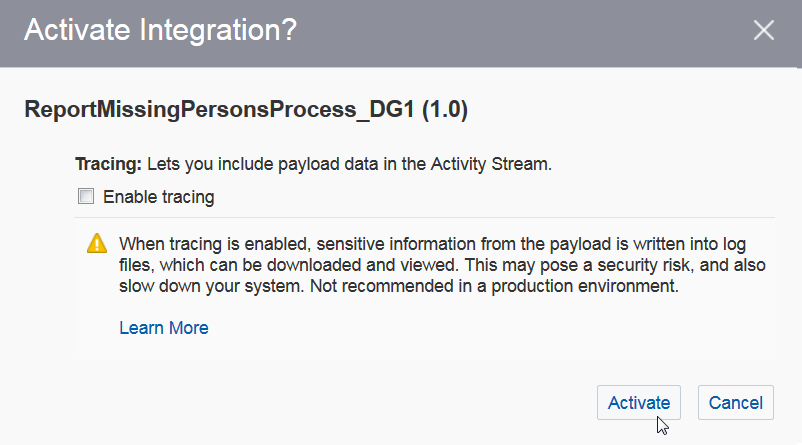
Once again you can Test your mapping to check if concat works correctly. Save and Exit the Mapper to return to the canvas. The final step before we can activate our orchestration is the set business identifiers. Since release 16.4.5 we a notified by an error in the ERRORS panel that we did not do this step yet.
![]()
In the top-right corner, click on the Tracking button to open the Business Identifiers dialogue. From the source tree drag and drop the ident field to first Tracking Field and rename the Tracking Name to Flight Id. Click Done to close the dialogue and subsequently click Save and Exit Integration.
When you return to page which displays the list of integrations, click on the activate switch to the right of our integration. This will show the new Activate Integration? popup which has changed since the release of our book. Click on the Activate button to trigger the activation process.
Testing the Orchestration
Before testing our solution, we need to know the web address for the endpoint our integration is running. Click the info icon on the right side of the activate switch of our entry to view its activation details. Find the Endpoint URL within the integration details and copy the address to your clipboard.
The URL will look similar to:
https://xxx-yyy.integration.zzz.oraclecloud.com/integration/ flowsvc/soap/REPORTMISSINGPER_DG1/v01/?wsdl
Invoke Cloud endpoint using SoapUI
For testing our cloud endpoint we are going to use SoapUI to simulate our Flight Tracking & Incident system. You create a new SoapUI project based on endpoint URL, but for your convenience you can download our sample SOAP project to use to make these steps easier.
Import the SoapUI project from the downloaded resources. This can be done through the File menu and selecting Import Project and selecting the project file FlightScheduleUpdate-Dg1-soapui-project.xml. This SoapUI project contains the SOAP binding to send messages to our orchestration and a test suite with two test cases. The first test case sends a list with multiple missing persons and one test case with no missing persons.

Before we can run the tests, we need to set up some project properties. In the project tree shown above double click on the project FlightScheduleUpdate_Dg1. This will show a dialogue with summary overview of project settings. On the bottom find the project properties and edit values for Identity, Domain and DataCenter to represent your ICS instance.
If you click on Multiple Persons or No Missing Persons a dialogue is shown where we can execute the test steps belonging to this group by clicking on the green play button. Click on Multiple Persons Testcases and subsequently click on the play button to execute test run. Before we run the testcase you also need to change the username and password property in the Properties test step for each test case. The following result will be executed if the orchestration is built correctly.
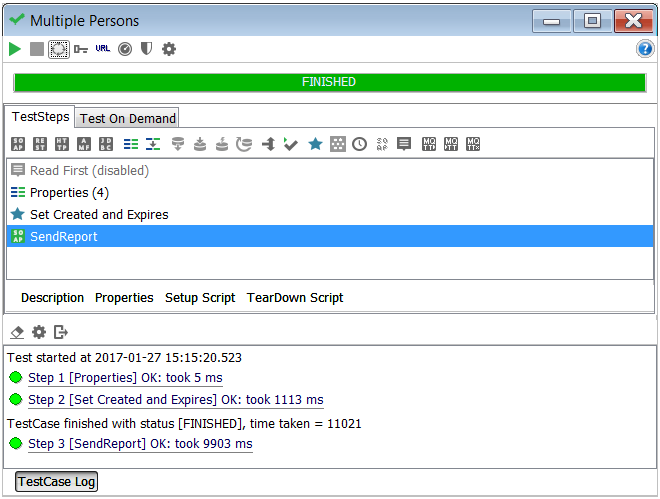
All steps should be executed with expected result. If we inspect the SendReport teststep, which can be done by clicking on the name of the teststep, we can see that our orchestration responded with a positive result. The message displays that two tasks are created.
[xml highlight="6"]<MissingPersonResult xmlns="http://oracle-integration.cloud/soap/dg1/FlightSchedules/" xmlns:nstrgmpr="http://oracle-integration.cloud/soap/dg1/FlightSchedules/">
  <nstrgmpr:parentID>1</nstrgmpr:parentID>
  <nstrgmpr:processed>1</nstrgmpr:processed>
  <nstrgmpr:message>Total tasks created: 2</nstrgmpr:message>
</MissingPersonResult>[/xml]
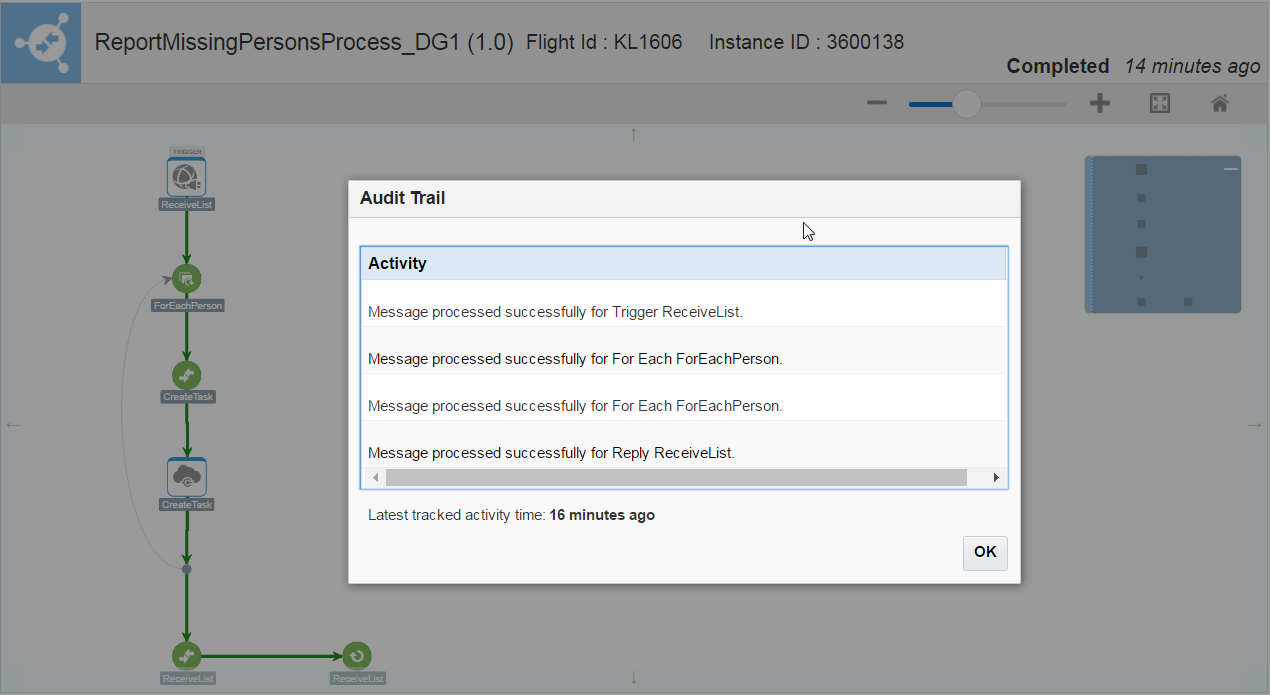
Now that we know that the orchestration processed the request with success we can take a look at the instance flow in ICS. In ICS navigate to Monitoring page and visit the Tracking section. Here you will see the completed instance and to see the flow click on the name of the instance Flight Id: KL1606. The execution flow is displayed. Despite the For Each it is not visibile how many times it is executed. To view this data we can view the audit trail by clicking on Actions | View Audit Trail in the top-right corner of the flow. Notice the ForEachPerson activity is executed twice because our request included two persons.
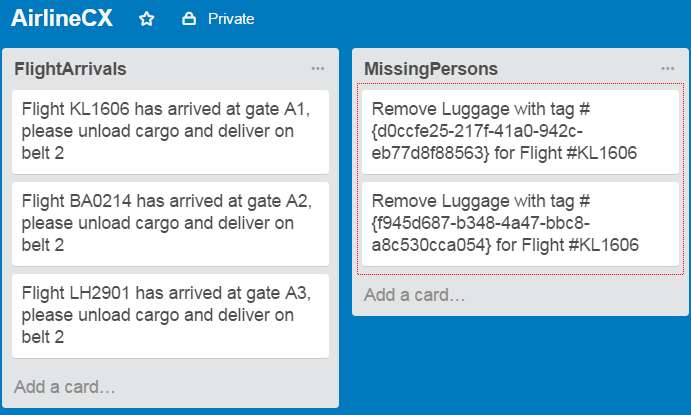
If we look at the MissingPersons list in Trello we see two tasks available.
Go back to SoapUI and execute the second test case. Click on No Missing Persons and execute the test steps. If we now look at the response from the SendReport call the message displays that zero tasks are created.
[xml highlight="6"]<MissingPersonResult xmlns="http://oracle-integration.cloud/soap/dg1/FlightSchedules/" xmlns:nstrgmpr="http://oracle-integration.cloud/soap/dg1/FlightSchedules/">
  <nstrgmpr:parentID>2</nstrgmpr:parentID>
  <nstrgmpr:processed>1</nstrgmpr:processed>
  <nstrgmpr:message>Total tasks created: 0</nstrgmpr:message>
</MissingPersonResult>[/xml]
You can check in instance in ICS if you navigate to Monitoring page and visit the Tracking section. Here you will see the new completed instance again click on the name of the instance Flight Id: KL1607. If you check Trello no new tasks are available.
This concludes this guide. In this guide we have created the necessary connections and a new orchestration. This orchestration could be invoked by a SOAP call and for each missing person in the request message a new task was created in Trello.


